DDR Verification Process
ID: RK-CS-YF-081
Release version: 1.5.0
Release Date: 2021-04-23
Security Level: Publicity
DISCLAIMER
THIS DOCUMENT IS PROVIDED “AS IS”. FUZHOU ROCKCHIP ELECTRONICS CO., LTD.(“ROCKCHIP”)DOES NOT PROVIDE ANY WARRANTY OF ANY KIND, EXPRESSED, IMPLIED OR OTHERWISE, WITH RESPECT TO THE ACCURACY, RELIABILITY, COMPLETENESS,MERCHANTABILITY, FITNESS FOR ANY PARTICULAR PURPOSE OR NON-INFRINGEMENT OF ANY REPRESENTATION, INFORMATION AND CONTENT IN THIS DOCUMENT. THIS DOCUMENT IS FOR REFERENCE ONLY. THIS DOCUMENT MAY BE UPDATED OR CHANGED WITHOUT ANY NOTICE AT ANY TIME DUE TO THE UPGRADES OF THE PRODUCT OR ANY OTHER REASONS.
Trademark Statement
“Rockchip”, “瑞芯微”, “瑞芯” shall be Rockchip’s registered trademarks and owned by Rockchip. All the other trademarks or registered trademarks mentioned in this document shall be owned by their respective owners.
All rights reserved. ©2021. Rockchip Electronics Co., Ltd.
Beyond the scope of fair use, neither any entity nor individual shall extract, copy, or distribute this document in any form in whole or in part without the written approval of Rockchip.
Rockchip Electronics Co., Ltd.
No.18 Building, A District, No.89, software Boulevard Fuzhou, Fujian, PRC
Website: www.rock-chips.com
Customer service Tel: +86-4007-700-590
Customer service Fax: +86-591-83951833
Customer service e-Mail: fae@rock-chips.com
Preface
This document introduces verification process of the Double Data Rate(DDR) SDRAM for compatibility and stability in all chip platform. It contains the following sections: Linux 3.10, Linux 4.xx (Linux 4.4 and Linux 4.19), RV1108 and RK3308. Please select the corresponding section for reference according to the actual test platform.
Product ID
| Chipset Name | Kernel Version |
|---|---|
| All chipset | All kernel version |
Application Object
This document (this guide) is intended primarily for the following readers:
Quality Testing Engineer
Field Application Engineer
Software Development Engineer
Revision History
| Version | Data | Author | History |
|---|---|---|---|
| V1.0.0 | 2017.11.21 | Youming Chen | First edition |
| V1.1.0 | 2018.03.22 | Youming Chen | Public information |
| V1.2.0 | 2018.10.11 | Zhihuan He | Added RK3308 DDR verification process description |
| V1.3.0 | 2019.06.03 | Youming Chen | Fix the description error on RebootTest and SleepTest |
| V1.3.1 | 2019.11.27 | Zhihuan He | Modify the document format, sync with Chinese document |
| V1.4.1 | 2021.04.12 | Wesley Yao | Add test method for devices NOT running Android |
| V1.5.0 | 2021.04.23 | Wesley Yao | Modify document format |
[TOC]
NOTE
-
The DDR verification process of RV1108 and RK3308 is different from other platforms. Please refer to the "RV1108 DDR verification process" and "RK3308 DDR verification process" sections in this document for details. For the other platforms, please select the corresponding section for reference according to the Linux version.
-
The test files which described in this document are required for the verification process. They are provided with this document.
Linux 3.10 DDR Verification Process
Linux 3.10 Compile Test Firmware
Please configure the menuconfig of the kernel code, enter the System Type, choose and open DDR Test and pm_tests.
  menuconfig
  System Type  --->
    [*]   /sys/pm_tests/ support
    [*]   DDR Test
If there is no[] /sys/pm_tests/ supportoption in menuconfig , please refer to the sections "How to Fix DDR Frequency" and "How to Enable/Disable the DDR Frequency Scaling Function in the Kernel" in "Rockchip_Developer_Guide_DDR_EN" to compile fixed or scaled DDR frequency firmware.
Linux 3.10 Set Up Test Environment
Download Firmware
Before test, you should know the following information:
- The test firmware for android version information. (eg: android4.4,android5.0,android6.0,android7.1 ...)
- 32bit OS or 64bit OS
- The total DDR capacity of the machine. (eg: 512MB or 1GB or 2GB ...)
- For fixed frequency test, the maximum frequency of DDR need to run. (eg: 456MHz or 533MHz ...)
- For scaled frequency test, the frequency range of DDR need to run. (eg: 200MHz - 456MHz or 200MHz-533MHz ...)
Automatically Set Up Test Environment
Enter the "linux3.10_ddr_test_files" directory of DDR test file, double-click push_files.bat directly, select and input 1 or 2 according to the script tips and firmware type. Then waiting the test environment complete automatically. If there is no error reported, you can skip the section "Manually Set Up Test Environment".
Manually Set Up Test Environment
If setting up test environment automatically failed, you can do it manually. Please select and install following files in the directory "linux3.10_ddr_test_files".
- Install fishingjoy.
<adb_tool> adb.exe install fishingjoy1.apk
- Push google stressapptest.
Please push the corresponding version of stressapptest according to the firmware version.
<adb_tool> adb.exe root
<adb_tool> adb.exe remount
<adb_tool> adb.exe push libstlport.so /system/lib/libstlport.so
<adb_tool> adb.exe shell chmod 644 /system/lib/libstlport.so
- If the firmware version is android4.4, please select stressapptest_android4.4 to push.
<adb_tool> adb.exe push stressapptest_android4.4 /data/stressapptest
<adb_tool> adb.exe shell chmod 0777 /data/stressapptest
- If the firmware version is not android4.4, please select stressapptest to push.
<adb_tool> adb.exe push stressapptest /data/stressapptest
<adb_tool> adb.exe shell chmod 0777 /data/stressapptest
- Push memtester.
Please push the corresponding memtester according to the firmware version.
Eg:
- If the firmware of the test machine is Linux 32bit, select memtester_32bit to push.
<adb_tool> adb.exe push memtester_32bit /data/memtester
<adb_tool> adb.exe shell chmod 644 /data/memtester
- If the firmware of the test machine is Linux 64bit, select memtester_64bit to push.
<adb_tool> adb.exe push memtester_64bit /data/memtester
<adb_tool> adb.exe shell chmod 644 /data/memtester
- Sync
<adb_tool> adb.exe shell sync
Linux 3.10 Verify DDR Capacity
Check whether the MemTotal capacity matches the actual capacity of the test machine by<rkxxxx:/ $> cat /proc/meminfo
log eg:
<rkxxxx:/ $> cat /proc/meminfo
MemTotal:        2038904 kB
512MB is approximately equal to 533504kB
1GB is approximately equal to 1048576kB
1.5GB is approximately equal to 1582080kB
2GB is approximately equal to 2097152kB
3GB is approximately equal to 3145728kB
4GB is approximately equal to 4194304kB
Due to the difference in system memory allocation management, the slight deviation is normal.
Linux 3.10 Fix DDR Frequency Test
-
Open the fishingjoy.
-
Send
sucommand from the serial console.
<rkxxxx:/ $> su
- Fix DDR frequency.
Please set the maximum DDR frequency supported by the test machine.
eg:
If the maximum DDR frequency is 533MHz.
<rkxxxx:/ #> echo set clk_ddr 533000000 > /sys/pm_tests/clk_rate
- Do google stressapptest test, the test time is more than 12 hours.
- If the total capacity is 512MB, apply 64MB for stressapptest.
<rkxxxx:/ #> /data/stressapptest -s 43200 -i 4 -C 4 -W --stop_on_errors -M 64
- If the total capacity is 1GB, apply 128MB for stressapptest.
<rkxxxx:/ #> /data/stressapptest -s 43200 -i 4 -C 4 -W --stop_on_errors -M 128
- If the total capacity is 2GB, apply 256MB for stressapptest.
<rkxxxx:/ #> /data/stressapptest -s 43200 -i 4 -C 4 -W --stop_on_errors -M 256
- If the total capacity is 4MB, apply 512MB for stressapptest.
<rkxxxx:/ #> /data/stressapptest -s 43200 -i 4 -C 4 -W --stop_on_errors -M 512
- Confirm the test result.
At the end of testing, please confirm that whether the machine runs properly, whether the fishingjoy functions normally, the result of stressapptest is PASS or FAIL. The stressapptest will print a log every 10 seconds, and the log displays the rest of the test time. After completing, the result will be printed. If pass, it will print Status: PASS. If fail, it will print Status: FAIL.
- Do memtester test, the test time is more than 12 hours.
- If the total capacity is 512MB, apply 64MB for memtester.
<rkxxxx:/ #> /data/memtester 64m
- If the total capacity is 1GB, apply 128MB for memtester.
<rkxxxx:/ #> /data/memtester 128m
- If the total capacity is 2GB, apply 256MB for memtester.
<rkxxxx:/ #> /data/memtester 256m
- If the total capacity is 4GB, apply 512MB for memtester.
<rkxxxx:/ #> /data/memtester 512m
- Confirm the test result.
At the end of testing, please confirm that whether the machine runs properly, whether the fishingjoy functions normally, and whether the memtester reports errors. The memtester in DDR test file has been modified, it will be stopped automatically if any error is found in the test process. If the memtester is running more than 12 hours, it indicating that no error is found in the test process.
- If the memtester finds no error, it will continue to print the following log:
Loop 10:
    Stuck Address       : ok
    Random Value        : ok
    Compare XOR         : ok
    Compare SUB         : ok
    Compare MUL         : ok
    Compare DIV         : ok
    Compare OR          : ok
    Compare AND         : ok
    Sequential Increment: ok
    Solid Bits          : ok
    Block Sequential    : ok
    Checkerboard        : ok
    Bit Spread          : ok
    Bit Flip            : ok
    Walking Ones        : ok
    Walking Zeroes      : ok
- If any error is found in the memtester, it will automatically stop the test and exit. The log will be printed as follows:
FAILURE: 0xffffffff != 0xffffbfff at offset 0x03b7d9e4.
EXIT_FAIL_OTHERTEST
Linux 3.10 DDR Frequency Scaling
If the machine has done the fixed frequency test before, restart the machine, or the subsequent frequency scaling command will not be able to proceed.
-
Open the fishingjoy.
-
Send
sucommand from the serial console.
<rkxxxx:/ $> su
- Run memtester on backstage.
- If the total capacity is 512MB, apply 64MB for memtester.
<rkxxxx:/ #> /data/memtester 64m > /data/_log.txt &
- If the total capacity is 1GB, apply 128MB for memtester.
<rkxxxx:/ #> /data/memtester 128m > /data/memtester_log.txt &
- If the total capacity is 2GB, apply 256MB for memtester.
<rkxxxx:/ #> /data/memtester 256m > /data/memtester_log.txt &
- If the total capacity is 4GB, apply 512MB for memtester.
<rkxxxx:/ #> /data/memtester 512m > /data/memtester_log.txt &
- Execute frequency scaling command.
Setting frequency according to DDR frequency range supported by test machine.
Eg:
If the test machine supports a range of 200MHZ to 533MHz.
<rkxxxx:/ #> echo 'a:200M-533M-1000000T' > proc/driver/ddr_ts
- Confirm the test result, the test time is more than 12 hours.
- Confirming that whether the fishingjoy functions normally and whether the machine runs properly.
- Confirming that whether the frequency scaling program is running normally and whether the frequency scaling log is printing normally.
- Confirming that whether the memtester runs properly. Sending
<rkxxxx:/ #> ps | grep memtestercommand to confirm whether the memtester is still running .
Eg:
<rkxxxx:/ #>  ps | grep memtester
root      14309 1730  74332  68156          0 5e980bf564 R /data/memtester
Linux 3.10 Reboot Test
Open the Calculator, enter "83991906=", and click "RebootTest". The test time should be more than 12 hours.
Linux 4.xx DDR Verification Process
Linux 4.xx Compile Test Firmware
First, we must enable DDR frequency scaling function. Open the test machine board-level DTS file, find dfi and dmc nodes and configure status = "okay".
&dfi {
    status = "okay";
};

&dmc {
	status = "okay";
	........
};
Here is just a brief introduction for the DDR frequency scaling firmware compiling. If you need more, please refer to the section "How to Enable/Disable the DDR Frequency Scaling Function in the Kernel" in "Rockchip_Developer_Guide_DDR_EN" for details.
Linux 4.xx Set Up Test Environment
Firmware Download
Before test, you should know the following information:
- 32bit OS or 64bit OS
- The total DDR capacity of the test machine. (512MB or 1GB or 2GB ...)
- For fixed frequency test, DDR need to run the maximum frequency. (456MHz or 533MHz ...)
Automatically Set Up Environment
- Enter the "linux4.xx_ddr_test_files" directory of DDR test file, double-click push_files.bat file, select and input 1 or 2 according to the script tips and firmware type. Then waiting the test environment complete automatically.
Note: After running the script, you need to check whether everything is executed normally and confirm if there is any error message through the printed log.
- If there is no exception for automatic set up, you can skip the section "Manually Set Up Test Environment".
Manually Set Up Environment
If setting up test environment automatically failed, you can do it manually. Please select and install following files in the directory "linux4.xx_ddr_test_files".
- Install fishingjoy.
Note: Please skip this step when the device is NOT running Android.
<adb_tool> adb.exe install fishingjoy1.apk
- Push google stressapptest.
<adb_tool> adb.exe root
<adb_tool> adb.exe disable-verity
<adb_tool> adb.exe reboot
/* Wait for the machine to complete the restart, adb out, and then enter */
<adb_tool> adb.exe root
<adb_tool> adb.exe push stressapptest /data/stressapptest
<adb_tool> adb.exe shell chmod 0777 /data/stressapptest
<adb_tool> adb.exe remount
<adb_tool> adb.exe push libstlport.so /system/lib/libstlport.so
<adb_tool> adb.exe shell chmod 644 /system/lib/libstlport.so
<adb_tool> adb.exe shell sync
- Push memtester.
Please push the corresponding memtester according to whether the firmware is Linux 64bit or Linux 32bit.
Eg:
- If the test firmware is Linux 32bit, select memtester_32bit to push.
<adb_tool> adb.exe push memtester_32bit /data/memtester
<adb_tool> adb.exe shell chmod 644 /data/memtester
- If the test firmware is Linux 64bit, select memtester_64bit to push.
<adb_tool> adb.exe push memtester_64bit /data/memtester
<adb_tool> adb.exe shell chmod 644 /data/memtester
- Push ddr_freq_scan.sh.
<adb_tool> adb.exe push ddr_freq_scan.sh /data/ddr_freq_scan.sh
<adb_tool> adb.exe shell chmod 0777 /data/ddr_freq_scan.sh
Set Up Test Environment through U Disk and Serial Port
If the ADB cannot be connected, the files needed in the test process can be copied to the test board through U disk. And then the test environment can be built through the serial port.
- Preparatory Work.
- After the machine is power on, add wake_lock to prevent the machine from entering the system suspend by
echo 1 > /sys/power/wake_lock, or setting machine by Setting->Dsiplay->Sleep->Never sleep to keep awake. - The U disk is connected to the computer, then copy "linux4.xx_ddr_test_files" to U disk.
- The
sucommand is inputed from the serial console of the test machine.
<rk3399:/ $> su
- The U disk is connected to the test board, then copied the files under "linux4.xx_ddr_test_files" directory to the machine
/datadirectory. U disk is usually loaded in/MNT /media_rw/***directory (*** : the node name of each U disk is different, please use TAB key to fill the rest).
Eg:
<rk3399:/ #> cp /mnt/media_rw/B4FE-5315/linux4.xx_ddr_test_files/* /data/
- Automatically Set Up Test Environment.
<rk3399:/ #> chmod 777 /data/test_files_install.sh
<rk3399:/ #> /data/test_files_install.sh
If there is no exception for automatic set up, you can skip the section "Manually Set Up Test Environment".
- Manually Set Up Test Environment.
If setting up test environment automatically failed, you can do it manually.
- Copy libstlport.so to the
/systemdirectory.
<rk3399:/ #> mount -o rw,remount /system
<rk3399:/ #> cp /data/libstlport.so /system/lib/
<rk3399:/ #> chmod 644 /system/lib/libstlport.so
- Change permission.
<rk3399:/ #> chmod 777 /data/memtester /data/stressapptest /data/ddr_freq_scan.sh
- Install fishingjoy.
Note: Please skip this step when the device is NOT running Android.
<rk3399:/ #> pm install /data/fishingjoy1.apk
- Sync
<rk3399:/ #> sync
Linux 4.xx Verify DDR Capacity
Check whether the MemTotal capacity matches the actual capacity of the test machine by<rkxxxx:/ #> cat /proc/meminfo
log eg:
rkxxxx:/ # cat /proc/meminfo
MemTotal:        2038904 kB
512MB is approximately equal to 533504kB
1GB is approximately equal to 1048576kB
1.5GB is approximately equal to 1582080kB
2GB is approximately equal to 2097152kB
3GB is approximately equal to 3145728kB
4GB is approximately equal to 4194304kB
Due to the difference in system memory allocation management, the slight deviation is normal.
Linux 4.xx Fix DDR Frequency Test
-
Open the fishingjoy (Please skip this step when the device is NOT running Android).
-
Send
sucommand from the serial console.
<rkxxxx:/ $> su
- Fix DDR frequency.
Please set the maximum DDR frequency supported by the test machine.
Eg:
- If need to run 928MHz.
<rkxxxx:/ #> /data/ddr_freq_scan.sh 933000000
- If need to run 800MHz.
<rkxxxx:/ #> /data/ddr_freq_scan.sh 800000000
- If need to run 600MHz.
<rkxxxx:/ #> /data/ddr_freq_scan.sh 600000000
- Check the frequency is correct by log.
log eg:
130|rkxxxx:/ # /data/ddr_freq_scan.sh 800000000
already change to 800000000 done.
change frequency to available max frequency done.
- Do google stressapptest test, the test time is more than 12 hours.
- If the total capacity is 512MB, apply 64MB for stressapptest.
<rkxxxx:/ #> /data/stressapptest -s 43200 -i 4 -C 4 -W --stop_on_errors -M 64
- If the total capacity is 1GB, apply 128MB for stressapptest.
<rkxxxx:/ #> /data/stressapptest -s 43200 -i 4 -C 4 -W --stop_on_errors -M 128
- If the total capacity is 2GB, apply 256MB for stressapptest.
<rkxxxx:/ #> /data/stressapptest -s 43200 -i 4 -C 4 -W --stop_on_errors -M 256
- If the total capacity is 4GB, apply 512MB for stressapptest.
<rkxxxx:/ #> /data/stressapptest -s 43200 -i 4 -C 4 -W --stop_on_errors -M 512
- Confirm the test result.
At the end of testing, please confirm that whether the machine runs properly, whether the fishingjoy functions normally, the result of stressapptest is PASS or FAIL. The stressapptest will print a log every 10 seconds, and the log displays the rest of the test time. After completing, the result will be printed. If pass, it will print Status: PASS. If fail, it will print Status: FAIL.
- Do memtester test, the test time is more than 12 hours.
- If the total capacity is 512MB, apply 64MB for memtester.
<rkxxxx:/ #> /data/memtester 64m
- If the total capacity is 1GB, apply 128MB for memtester.
<rkxxxx:/ #> /data/memtester 128m
- If the total capacity is 2GB, apply 256MB for memtester.
<rkxxxx:/ #> /data/memtester 256m
- If the total capacity is 4GB, apply 512MB for memtester.
<rkxxxx:/ #> /data/memtester 512m
- Confirm the test result.
At the end of testing, please confirm that whether the machine runs properly, whether the fishingjoy functions normally and whether the memtester reports errors. The memtester in DDR test file has been modified, it will be stopped automatically if any error is found. If the memtester is running more than 12 hours, it indicating that no error is found in the test process.
- If the memtester finds no error, it will continue to print the following log:
Loop 10:
    Stuck Address       : ok
    Random Value        : ok
    Compare XOR         : ok
    Compare SUB         : ok
    Compare MUL         : ok
    Compare DIV         : ok
    Compare OR          : ok
    Compare AND         : ok
    Sequential Increment: ok
    Solid Bits          : ok
    Block Sequential    : ok
    Checkerboard        : ok
    Bit Spread          : ok
    Bit Flip            : ok
    Walking Ones        : ok
    Walking Zeroes      : ok
- If any error is found in the memtester, it will automatically stop the test and exit. The log will be printed as follows:
FAILURE: 0xffffffff != 0xffffbfff at offset 0x03b7d9e4.
EXIT_FAIL_OTHERTEST
Linux 4.xx DDR Frequency Scaling
-
Open the fishingjoy (Please skip this step when the device is NOT running Android).
-
Send
sucommand from the serial console.
<rkxxxx:/$> su
- Run memtester on backstage.
- If the total capacity is 512MB, apply 64MB for memtester.
<rkxxxx:/ #> /data/memtester 64m > /data/memtester_log.txt &
- If the total capacity is 1GB, apply 128MB for memtester.
<rkxxxx:/ #> /data/memtester 128m > /data/memtester_log.txt &
- If the total capacity is 2GB, apply 256MB for memtester.
<rkxxxx:/ #> /data/memtester 256m > /data/memtester_log.txt &
- If the total capacity is 4GB, apply 512MB for memtester.
<rkxxxx:/ #> /data/memtester 512m > /data/memtester_log.txt &
- Execute test scripts.
<rkxxxx9:/ #> /data/ddr_freq_scan.sh
- Confirm the test result, the test time is more than 12 hours.
-
Confirming that whether the fishingjoy functions normally and whether the machine runs properly.
-
Confirming that whether the memtester runs properly. Sending
ps | grep memtestercommand to confirm whether the memtester is still running.
Eg:
<rkxxxx:/ #>  ps | grep memtester
root      14309 1730  74332  68156          0 5e980bf564 R /data/memtester
- Confirming that whether the frequency scaling program is running normally and whether the frequency scaling log is printed normally.
log eg:
DDR freq will change to 600000000 8786
already change to 600000000 done
DDR freq will change to 800000000 8787
already change to 800000000 done
DDR freq will change to 200000000 8788
already change to 200000000 done
Linux 4.xx Reboot Test
Reboot test via calculator when running Android
==To avoid machine going into sleep, make machine skip the lock screen interface and directly enter the main interface by setting->security->set screen lock->None. At the same time, setting machine by Setting->Dsiplay->Sleep->Never sleep to keep awake.==
Open the Calculator, enter "83991906=", then click "RebootTest". The test time should be more than 12 hours.
Reboot test via rockchip_test.sh when NOT running Android
- Send su command
[root@RV1126_RV1109:/]# su
- Run /rockchip_test/rockchip_test.sh, enter the number corresponding to auto reboot test
[root@RV1126_RV1109:/]# /rockchip_test/rockchip_test.sh
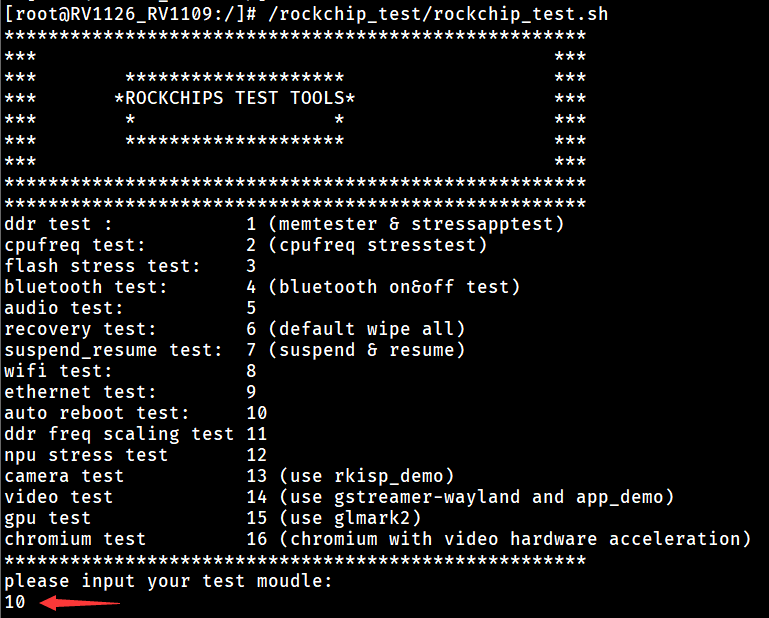
- Test at least 12 hours, and check if the device is working properly. Turn off reboot test with command
[root@RV1126_RV1109:/]# echo off > /data/cfg/rockchip_test/reboot_cnt
Linux 4.xx Sleep Test
For RK3399 LPDDR4, this test is required. This test is optional for other DDR types and other platforms.
Sleep test via calculator when running Android
Unplug the USB cable which connected to ADB. Open the Calculator, enter "83991906=", then click "SleepTest". The test time will be more than 12 hours.
Sleep test via rockchip_test.sh when NOT running Android
- Send su command
[root@RV1126_RV1109:/]# su
- Run /rockchip_test/rockchip_test.sh, enter the number corresponding to suspend_resume test, then enter the number corresponding to auto suspend (resume by rtc)
[root@RV1126_RV1109:/]# /rockchip_test/rockchip_test.sh
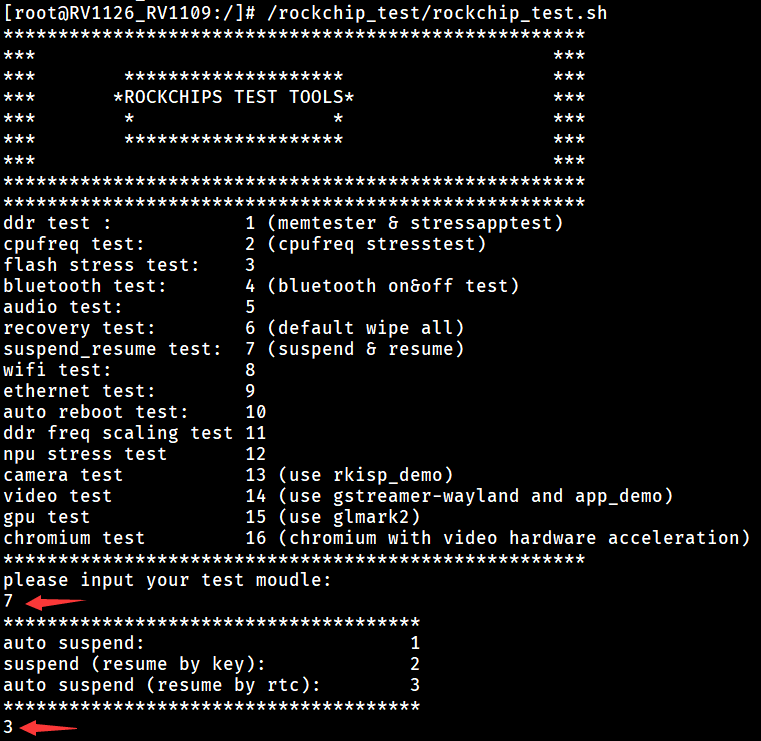
- Test at least 12 hours, and check if the device is working properly
RV1108 DDR Verification Process
RV1108 Test Firmware Compile
Please configure the menuconfig of the kernel code, enter System Type and select DDR Test and pm_tests.
  menuconfig
  System Type  --->
    [*]   /sys/pm_tests/ support
    [*]   DDR Test
If there is no[] /sys/pm_tests/ supportoption in menuconfig, please refer to the sections "How to Fix DDR Frequency" and "How to Enable/Disable the DDR Frequency Scaling Function in the Kernel" in "Rockchip_Developer_Guide_DDR" to compile fixed or scaled DDR frequency firmware.
RV1108 Set Up Test Environment
Please copy stressapptest and memtester_32bit from "rv1108_ddr_test_files" directory into SD root/ directory, and plug the card into test board.
RV1108 Verify DDR Capacity
Check whether the MemTotal capacity matches the actual capacity of the test machine by <rv1108:/ #> cat /proc/meminfo
log eg:
<rv1108:/ #> cat /proc/meminfo
MemTotal:        133376 kB
64MB is approximately equal to 66688kB
128MB is approximately equal to 133376kB
256MB is approximately equal to 266752kB
512MB is approximately equal to 533504kB
Due to the difference in system memory allocation management, the slight deviation is normal.
RV1108 Fix DDR Frequency Test
- Fix ddr frequency.
Please set the maximum DDR frequency supported by the test machine.
Eg:
If the maximum DDR frequency supported by the test machine is 800MHz.
<rv1108:/ #> echo set clk_ddr 800000000 > /sys/pm_tests/clk_rate
- Do google stressapptest test, the test time is more than 12 hours.
If the total capacity is 128MB, apply 16MB for stressapptest. Usually one eighth of the total capacity.
<rv1108:/ #> /mnt/sdcard/stressapptest -s 500 -i 1 -C 1 -W --stop_on_errors -M 16
- Confirm the test result.
At the end of testing, please confirm that whether the machine runs properly, the result of stressapptest is PASS or FAIL. The stressapptest will print a log every 10 seconds, and the log displays the rest of the test time. After completing, the result will be printed. If pass, it will print Status: PASS. If fail, it will print Status: FAIL.
- Do memtester test, the test time is more than 12 hours.
If the total capacity is 128MB, apply 16MB for stressapptest. Usually one eighth of the total capacity.
<rv1108:/ #> /mnt/sdcard/memtester_32bit 16m
- Confirm the test result.
At the end of testing, please confirm that whether the machine runs properly and whether the memtester reports errors. The memtester in DDR test file has been modified, it will be stopped automatically if any error is found in the test process. If the memtester is running more than 12 hours, it indicating that no error is found in the test process.
- If the memtester finds no error, it will continue to print the following log:
Loop 10:
     Stuck Address       : ok
     Random Value        : ok
     Compare XOR         : ok
     Compare SUB         : ok
     Compare MUL         : ok
     Compare DIV         : ok
     Compare OR          : ok
     Compare AND         : ok
     Sequential Increment: ok
     Solid Bits          : ok
     Block Sequential    : ok
     Checkerboard        : ok
     Bit Spread          : ok
     Bit Flip            : ok
     Walking Ones        : ok
     Walking Zeroes      : ok
- If any error is found in the memtester, it will automatically stop the test and exit. The log will be printed as follows:
   FAILURE: 0xffffffff != 0xffffbfff at offset 0x03b7d9e4.
   EXIT_FAIL_OTHERTEST
RV1108 DDR Frequency Scaling
If the machine has done the fixed frequency test before, restart the machine, or the subsequent frequency scaling command will not be able to proceed.
- Run memtester on backstage.
If the total capacity is 128MB, apply 16MB for memtester. Usually one eighth of the total capacity.
<rv1108:/ #> /mnt/sdcard/memtester_32bit 16m > /data/memtester_log.txt &
- Execute frequency scaling command.
The frequency range of the test is from 400MHz to maximum frequency of the machine.
Eg:
If the test machine to run DDR maximum frequency is 800MHz.
<rv1108:/ #> echo 'a:400M-800M-1000000T' > proc/driver/ddr_ts
- Confirm the test result, the test time is more than 12 hours.
-
Confirming whether the machine runs properly.
-
Confirming that whether the DDR frequency scaling program is running normally and whether the frequency scaling log is printed normally.
-
Confirming that whether the memtester runs properly. Sending
<rkxxxx:/ #> ps | grep memtestercommand to confirm whether the memtester is still running.
Eg:
<rkxxxx:/ #>  ps | grep memtester
root      14309 1730  74332  68156          0 5e980bf564 R /data/memtester
RV1108 Reboot Test
We can use 1108 own reboot feature: menu -> debug -> reboot test
RK3308 DDR Verification Process
RK3308 Verify DDR Capacity
Check whether the MemTotal capacity matches the actual capacity of the test machine by <rk3308:/ #> cat /proc/meminfo
log eg:
<rk3308:/ #> cat /proc/meminfo
MemTotal:         246832 kB
MemFree:          201800 kB
64MB is approximately equal to 66688kB
128MB is approximately equal to 133376kB
256MB is approximately equal to 266752kB
512MB is approximately equal to 533504kB
Due to the difference in system memory allocation management, the slight deviation is normal.
RK3308 Fix DDR Frequency Test
Since 3308 does not support DDR frequency scaling, the frequency set by the loader during initialization and it will not be modified later. please use the maximum frequency loader. DDR3 please select 800MHz loader,DDR2 and LPDDR2 please select 533MHz loader.
- Do memtester test, the test time is more than 12 hours.
First, you need to confirm whether the test file is existed or not:
<rk3308:/ #> ls usr/bin/memtester
usr/bin/memtester
- If memtester file is existed, the test command is as follows: (If the total capacity is 128MB, apply 16MB for memtester. Usually one eighth of the total capacity.)
<rk3308:/ #> memtester 16m > /data/memtester_log.txt &
- If there is not the test file, please push the memtester_32bit.32bit (or memtester_64bit.64bit) file through ADB tool to the
/data/directory: (Linux-32 system chooses memtester_32bit.32bit, Linux-64 system chooses memtester_64bit.64bit)
Linux-32 system command:
adb push \*file path*\memtester_32bit.32bit data/memtester
Linux-64 system command:
adb push \*file path*\memtester_64bit.64bit data/memtester
Change permission:
<rk3308:/ #> chmod 777 /data/memtester
Memtester test command as follow: (If the total capacity is 128MB, apply 16MB for memtester. Usually one eighth of the total capacity.)
<rk3308:/ #> /data/memtester 16m > /data/memtester_log.txt &
- Confirm the test result.
- At the end of testing, confirm whether the machine runs properly.
- Confirming whether the memtester reports errors: (Note that the memtester will ==not stop== automatically if error is found and you need to check all of print.)
- If the memtester finds no error, it will continue to print the following log:
Loop 1:
  Stuck Address       : ok
  Random Value        : ok
  Compare XOR         : ok
  Compare SUB         : ok
  Compare MUL         : ok
  Compare DIV         : ok
  Compare OR          : ok
  Compare AND         : ok
  Sequential Increment: ok
  Solid Bits          : ok
  Block Sequential    : ok
  Checkerboard        : ok
  Bit Spread          : ok
  Bit Flip            : ok
  Walking Ones        : ok
  Walking Zeroes      : ok
  8-bit Writes        : ok
  16-bit Writes       : ok
- If error is found in the memtester, it will not stop automatically. The log will be printed as follows:
Loop 92:
  Stuck Address       : ok
  Random Value        : FAILURE: 0x37fe0f4190f6b999 != 0x37fe0f4196f6b999 at offset 0x0027a958.
FAILURE: 0x2823d0d6f62a4b01 != 0x2823d0d6f02a4b01 at offset 0x0027a958.
  Compare XOR         : FAILURE: 0x4c4f418e764340e8 != 0x4c4f418e704340e8 at offset 0x0027a958.
  Compare SUB         : FAILURE: 0x2856fb8ee22bd230 != 0xfe5ee503ee2bd230 at offset 0x0027a958.
  Compare MUL         : FAILURE: 0x00000000 != 0x00000001 at offset 0x0027a958.
  Compare DIV         : FAILURE: 0xefb2eceaffbf9604 != 0xefb2eceaffbf9605 at offset 0x0027a958.
  Compare OR          : FAILURE: 0xcbb2a0e8cfbb8200 != 0xcbb2a0e8cfbb8201 at offset 0x0027a958.
  Compare AND         :   Sequential Increment: ok
  Solid Bits          : ok
  Block Sequential    : ok
  Checkerboard        : ok
  Bit Spread          : ok
  Bit Flip            : ok
  Walking Ones        : ok
  Walking Zeroes      : ok
  8-bit Writes        : ok
  16-bit Writes       : ok
- Do google stressapptest test, the test time is more than 12 hours.
First, you need to confirm whether the test file is existed or not:
<rk3308:/ #> ls usr/bin/stressapptest
usr/bin/stressapptest
- If stressapptest file is existed, the test command is as follows: (If the total capacity is 256MB, apply 32MB for stressapptest. Usually one eighth of the total capacity. The test time is controlled by the parameter after -s whose uint is seconds. The following command is test for 24 hours.)
<rk3308:/ #> stressapptest -s 86400 -i 4 -C 4 -W --stop_on_errors -M 32
- If there is not the test file, push the stressapptest_32bit (or stressapptest_64bit) file through ADB tool to the
/data/directory: (Linux-32 system chooses stressapptest_32bit, Linux-64 system chooses stressapptest_64bit. )
Linux-32 system command:
adb push \*file path*\stressapptest_32bit data/stressapptest
Linux-64 system command:
adb push \*file path*\stressapptest_64bit data/stressapptest
Change permission:
<rk3308:/ #> chmod 777 /data/stressapptest
Stressapptest test command as follows: (If the total capacity is 256MB, apply 32MB for stressapptest. Usually one eighth of the total capacity. The following is the command for copying the machine for 24 hours.)
<rk3308:/ #> /data/stressapptest -s 86400 -i 4 -C 4 -W --stop_on_errors -M 32
- Confirm the test result.
- At the end of testing, please confirm whether the machine runs properly.
- Confirming the result of stressapptest is PASS or FAIL. The stressapptest will print a log every 10 seconds, and the log displays the rest of the test time. After completing, the result will be printed. If pass, it will print Status: PASS. If fail, it will print Status: FAIL.
RK3308 suspend test
The suspend test requires kernel to enable automatic wake-up function. Open "rk3308. dtsi" file and find the node of rockchip_suspend, bitwise OR RKPM_TIMEOUT_WAKEUP_EN as follows:
rockchip_suspend: rockchip-suspend {
				...
                rockchip,wakeup-config = <
                        (0
                        | RKPM_GPIO0_WAKEUP_EN
                        | RKPM_TIMEOUT_WAKEUP_EN
                        )
                >;
        };
After compiling the firmware, it is recommended to use script for the suspend test. First, you need to confirm whether the test file is existed or not:
<rk3308:/ #> ls rockchip_test/rockchip_test.sh
rockchip_test/rockchip_test.sh
- If test file is existed, the test command is as follows:
<rk3308:/ #> /rockchip_test/rockchip_test.sh
...
please input your test moudle: //the serial console first input 8<enter>,then 1<enter>
8
1
- If there is no test file, you can directly input a command from the serial console to do suspend test. The command is as follows:
<rk3308:/ #> while true; do echo mem > /sys/power/state; sleep 5; done
The test time is more than 12 hours, then confirm whether the machine runs properly.
RK3308 reboot test
It is recommended to do reboot test by the 3308 test script. First, you need to confirm whether the test file is existed or not:
<rk3308:/ #> ls rockchip_test/rockchip_test.sh
rockchip_test/rockchip_test.sh
- If test file is existed, reboot command is as follows:
<rk3308:/ #> /rockchip_test/rockchip_test.sh
...
please input your test moudle: //the serial console input 13<enter>
13
- If there is no test file, push auto_reboot_test.sh file to the
/data/directory:
adb push \*file path*\auto_reboot_test.sh data/.
Change permission:
<rk3308:/ #> chmod 777 /data/auto_reboot_test.sh
The reboot command is as follows:
<rk3308:/ #> /data/auto_reboot_test.sh
The test time is more than 12 hours, then confirm whether the machine runs properly.