CPUFreq Developer Guide
ID: RK-KF-YF-008
Release Version: V1.1.1
Release Date: 2021-02-25
Security Level: □Top-Secret □Secret □Internal ■Public
DISCLAIMER
THIS DOCUMENT IS PROVIDED “AS IS”. ROCKCHIP ELECTRONICS CO., LTD.(“ROCKCHIP”)DOES NOT PROVIDE ANY WARRANTY OF ANY KIND, EXPRESSED, IMPLIED OR OTHERWISE, WITH RESPECT TO THE ACCURACY, RELIABILITY, COMPLETENESS,MERCHANTABILITY, FITNESS FOR ANY PARTICULAR PURPOSE OR NON-INFRINGEMENT OF ANY REPRESENTATION, INFORMATION AND CONTENT IN THIS DOCUMENT. THIS DOCUMENT IS FOR REFERENCE ONLY. THIS DOCUMENT MAY BE UPDATED OR CHANGED WITHOUT ANY NOTICE AT ANY TIME DUE TO THE UPGRADES OF THE PRODUCT OR ANY OTHER REASONS.
Trademark Statement
"Rockchip", "瑞芯微", "瑞芯" shall be Rockchip’s registered trademarks and owned by Rockchip. All the other trademarks or registered trademarks mentioned in this document shall be owned by their respective owners.
All rights reserved. ©2021. Rockchip Electronics Co., Ltd.
Beyond the scope of fair use, neither any entity nor individual shall extract, copy, or distribute this document in any form in whole or in part without the written approval of Rockchip.
Rockchip Electronics Co., Ltd.
No.18 Building, A District, No.89, software Boulevard Fuzhou, Fujian,PRC
Website: www.rock-chips.com
Customer service Tel: +86-4007-700-590
Customer service Fax: +86-591-83951833
Customer service e-Mail: fae@rock-chips.com
Preface
Overview
This document mainly describes the related concepts, configuration methods and user interface of CPUFreq.
Product Version
| Chipset | Kernel Version |
|---|---|
| All chipsets of Rockchip | Linux4.4, Linux4.19 |
Intended Audience
This document (this guide) is mainly intended for:
Technical support engineers
Software development engineers
Revision History
| Version | Author | Date | Change Description |
|---|---|---|---|
| V1.0.0 | Finley Xiao | 2018-12-04 | Initial version |
| V1.1.0 | Finley Xiao | 2019-11-14 | Add content about Linux4.19 |
| V1.1.1 | Karen Huang | 2021-02-25 | Modify format |
Contents
[TOC]
Overview
CPUFreq is a framework model defined by the kernel developer to dynamically change the CPU frequency and voltage according to the specified governor. It can be effective to lower power consumption of the CPU with taking into account the performance of the CPU. CPUFreq framework consists of governor, core, driver, stats. The software architecture is as below:
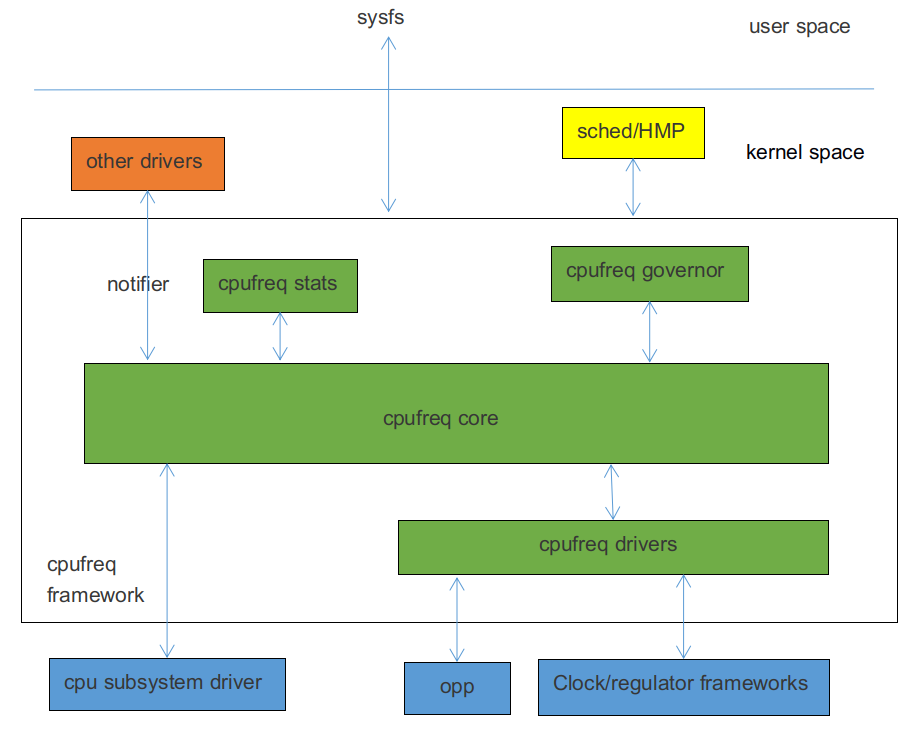
CPUFreq governor:It is used to determine when to chang the CPU frequency and which frequency will be chang to. The kernel includes the following governor:
- conservative:Change frequency dynamically according to CPU load, increase or decrease frequency smoothly by a certain proportion.
- ondemand:Change frequency dynamically according to CPU load, The frequency may change with big range, for example, directly change from the highest frequency or lowest frequency.
- interactive:Change frequency dynamically according to CPU load, compared with ondemand, it is faster respond, more parameters and more flexible.
- userspace:A user interface is provided for the user mode application to change the frequency.
- powersave:Prefer power consumption and set frequency to the lowest value always.
- performance:Prefer performance and set frequency to the highest value always.
- schedutil:A special governor for EAS. EAS (Energy Aware Scheduling) is a new generation of task scheduling strategy, combined with CPUFreq and CPU Idle's strategy, when it select running CPU for a task, which considering both performance and power consumption, ensuring the lowest system energy consumption, and will not have an impact on performance.
CPUFreq core:Encapsulate and abstract the cpufreq governors, cpufreq drivers and define a clear interface.
CPUFreq driver:Use to initialize the CPU frequency table and set CPU frequency.
CPUFreq stats:Provide statistics about cpufreq.
Code Path
Governor related code:
drivers/cpufreq/cpufreq_conservative.c        /* conservative governor */
drivers/cpufreq/cpufreq_ondemand.c            /* ondemand governor */
drivers/cpufreq/cpufreq_interactive.c         /* interactive governor */
drivers/cpufreq/cpufreq_userspace.c           /* userspace governor */
drivers/cpufreq/cpufreq_performance.c         /* performance governor */
kernel/sched/cpufreq_schedutil.c              /* schedutil governor */
Stats related code:
drivers/cpufreq/cpufreq_stats.c
Core related code:
drivers/cpufreq/cpufreq.c
Driver related code:
drivers/cpufreq/cpufreq-dt.c                  /* platform driver */
drivers/cpufreq/rockchip-cpufreq.c            /* platform device */
drivers/soc/rockchip/rockchip_opp_select.c    /* interface for changing opp */
Configuration
Menuconfig
CPU Power Management  --->
	CPU Frequency scaling  --->
		[*] CPU Frequency scaling
		<*>   CPU frequency translation statistics       /* cpufreq stats */
		[ ]     CPU frequency translation statistics details
		[*]   CPU frequency time-in-state statistics
			Default CPUFreq governor (interactive)  ---> /* cpufreq governor */
		<*>   'performance' governor
		<*>   'powersave' governor
		<*>   'userspace' governor for userspace frequency scaling
		<*>   'ondemand' cpufreq policy governor
		-*-   'interactive' cpufreq policy governor
		<*>   'conservative' cpufreq governor
		[ ]   'schedutil' cpufreq policy governor
			*** CPU frequency scaling drivers ***
		<*>   Generic DT based cpufreq driver           /* platform driver */
		< >   Generic ARM big LITTLE CPUfreq driver
		<*>   Rockchip CPUfreq driver                   /* platform device */
Through "Default CPUFreq governor", you can select the frequency scaling governor and modify it according to the actual product requirements.
Clock Configuration
According to the actual situation of platform, add the "clock" property to the CPU node, in which is generally the DTSI file. If you need more detail about configuration description of clock, please refer to the related Rockchip clock development documentation.
For non-big.LITTLE core platforms, such as RK3326, RK3328, please add "clocks = <&cru ARMCLK>;" to the CPU0 node. Take RK3328 as an example:
cpu0: cpu@0 {
	device_type = "cpu";
	compatible = "arm,cortex-a53", "arm,armv8";
	...
	clocks = <&cru ARMCLK>;
};
For big.LITTLE core platforms such as RK3368, RK3399, please add "clocks = <&cru ARMCLKB>;" to each CPU node of the big core and add "clocks = <&cru ARMCLKL>;" to the CPU node of each little core, taking RK3399 as an example:
cpu_l0: cpu@0 {
	device_type = "cpu";
	compatible = "arm,cortex-a53", "arm,armv8";
	...
	clocks = <&cru ARMCLKL>;
};

cpu_l1: cpu@1 {
	device_type = "cpu";
	compatible = "arm,cortex-a53", "arm,armv8";
	...
	clocks = <&cru ARMCLKL>;
};

cpu_l2: cpu@2 {
	device_type = "cpu";
	compatible = "arm,cortex-a53", "arm,armv8";
	...
	clocks = <&cru ARMCLKL>;
};

cpu_l3: cpu@3 {
	device_type = "cpu";
	compatible = "arm,cortex-a53", "arm,armv8";
	...
	clocks = <&cru ARMCLKL>;
};

cpu_b0: cpu@100 {
	device_type = "cpu";
	compatible = "arm,cortex-a72", "arm,armv8";
	...
	clocks = <&cru ARMCLKB>;
};

cpu_b1: cpu@101 {
	device_type = "cpu";
	compatible = "arm,cortex-a72", "arm,armv8";
	...
	clocks = <&cru ARMCLKB>;
};
Note: If the clock is not configured, the CPUFreq driver will fail to, it will print the following error:
cpu cpu0: failed to get clock: -2
cpufreq-dt: probe of cpufreq-dt failed with error -2
Regulator Configuration
According to the actual product hardware power solution, add the “cpu-supply” property to the CPU node, in which is generally board-level DTS file. For detailed configuration instructions of Regulator, please refer to the development documentation related to Regulator and PMIC.
For non-big.LITTLE core platforms, please add the "cpu-supply" propery to the CPU0 node, taking RK3328 as an example:
&i2c1 {
	status = "okay";
	rk805: rk805@18 {
		compatible = "rockchip,rk805";
		status = "okay";
		...
		regulators {
			compatible = "rk805-regulator";
			status = "okay";
			...
			vdd_arm: RK805_DCDC2 {
				regulator-compatible = "RK805_DCDC2";
				regulator-name = "vdd_arm";
				regulator-init-microvolt = <1225000>;
				regulator-min-microvolt = <712500>;
				regulator-max-microvolt = <1450000>;
				regulator-initial-mode = <0x1>;
				regulator-ramp-delay = <12500>;
				regulator-boot-on;
				regulator-always-on;
				regulator-state-mem {
					regulator-mode = <0x2>;
					regulator-on-in-suspend;
					regulator-suspend-microvolt = <950000>;
				};
			};
			...
		};
	};
};

&cpu0 {
	cpu-supply = <&vdd_arm>;
};
For big.LITTLE core platforms please add “cpu-supply” to each CPU node, taking RK3399 as an example:
&cpu_l0 {
	cpu-supply = <&vdd_cpu_l>;
};

&cpu_l1 {
	cpu-supply = <&vdd_cpu_l>;
};

&cpu_l2 {
	cpu-supply = <&vdd_cpu_l>;
};

&cpu_l3 {
	cpu-supply = <&vdd_cpu_l>;
};

&cpu_b0 {
	cpu-supply = <&vdd_cpu_b>;
};

&cpu_b1 {
	cpu-supply = <&vdd_cpu_b>;
};
Note: If the regulator is not configured, the cpufreq driver can still be loaded successfully. It is considered that the CPU frequency will be changed without changing voltage. But when the frequency over some value, it may be crash due to the low voltage.
OPP Table Configuration
The kernel puts the related configuration of frequency and voltage in the devicetree. These nodes make up by configuration information is called OPP Table. The OPP Table node contains the frequency and voltage of OPP nodes, leakage configuration properties, and PVTM configuration properties.
For detailed configuration instructions of OPP, refer to the following documents:
Documentation/devicetree/bindings/opp/opp.txt
Documentation/power/opp.txt
Add OPP Table
According to the actual situation of the platform, add an OPP Table node and add the "operating-points-v2" property under each CPU node, generally in the DTSI file. Take RK3328 as an example:
cpu0: cpu@0 {
	device_type = "cpu";
	compatible = "arm,cortex-a53", "arm,armv8";
	...
	operating-points-v2 = <&cpu0_opp_table>;
};
cpu1: cpu@1 {
	device_type = "cpu";
	compatible = "arm,cortex-a53", "arm,armv8";
	...
	operating-points-v2 = <&cpu0_opp_table>;
};
cpu2: cpu@2 {
	device_type = "cpu";
	compatible = "arm,cortex-a53", "arm,armv8";
	...
	operating-points-v2 = <&cpu0_opp_table>;
};
cpu3: cpu@3 {
	device_type = "cpu";
	compatible = "arm,cortex-a53", "arm,armv8";
	...
	operating-points-v2 = <&cpu0_opp_table>;
};

cpu0_opp_table: opp_table0 {
	compatible = "operating-points-v2";
	opp-shared;    /* indicate the OPP Table is shared by multiple CPUs. */

	/*
	 * The frequency conversion factor, it will be converted into a frequency by a
	 * certain algorithm, indicating the highest frequency limited by this platform, and
	 * the higher frequency will be deleted. For example, "13" is converted to
	 * frequency "1296MHz", the frequency more than 1296MHz in the OPP Table will be
	 * deleted. It is used to prevent the error of filling in a high frequency which
	 * isn't supported by the platform and it would be no need generally.
	 */
	rockchip,avs-scale = <13>;

	opp-408000000 {
		opp-hz = /bits/ 64 <408000000>;         /* Hz */
		opp-microvolt = <950000 950000 1350000>;/* uV, <target min max> */
		/* ns, the time required to complete the transformation */
        clock-latency-ns = <40000>;
		/*
		 * when suspend or the entire big or little cores are shut down, the CPU
		 * frequency will be set to the OPP freqency. Only one OPP node contains this
		 * property in a OPP Table.
		 */
		opp-suspend;
	};
	...
	opp-1296000000 {
		opp-hz = /bits/ 64 <1296000000>;
		opp-microvolt = <1350000 1350000 1350000>;
		clock-latency-ns = <40000>;
	};
}
Note : If OPP Table doesn't not contain "operating-points-v2", cpufreq will fail to initial, the system cannot change frequancy and voltage and print error like below:
cpu cpu0: OPP-v2 not supported
cpu cpu0: couldn't find opp table for cpu:0, -19
Delete OPP
If the developer needs to delete some frequency points, the following method can be used.
Method 1: Add "status = "disabeld";" to the corresponding OPP node, for example:
cpu0_opp_table: opp_table0 {
	compatible = "operating-points-v2";
	opp-shared;

	opp-408000000 {
		opp-hz = /bits/ 64 <408000000>;
		opp-microvolt = <950000 950000 1350000>;
		clock-latency-ns = <40000>;
	};
	...
	opp-1296000000 {
		opp-hz = /bits/ 64 <1296000000>;
		opp-microvolt = <1350000 1350000 1350000>;
		clock-latency-ns = <40000>;
		status = "disabled";
	};
}
Method 2: Re-quote the "OPP Table" node in the board-level DTS and add "status = "disabeld";" to the corresponding OPP node, for example:
&cpu0_opp_table {
	opp-1296000000 {
		status = "disabled";
	};
};
Modify OPP Table According to Leakage
IDDQ (Integrated Circuit Quiescent Current) , we also call it leakage. The CPU's leakage means the quiescent current of CPU when provide a specific voltage. At chip producing, the leakage value will be written to eFuse or OTP.
Modify Voltage According to Leakage
Background: we find that the Vmin of small leakage chips is larger than big leakage chips from test, so we can reduce the voltage for big leakage chips to reduce power consumption and improve performance.
Function description: get the CPU leakage value from eFuse or OTP and get the voltage selector corresponding to the leakage from a particular table, then we can find a property "opp-microvolt-<selector>" in each OPP, it is the target voltage for the OPP.
Configure method: Firstly, you need to add related code for eFuse or OTP. For details, please refer to the related documents of eFuse and OTP. Then, add three properties "rockchip, leak-voltage-sel", "nvmem-cells", and "nvmem-cell-names" at OPP Table node. Meanwhile, add the "opp-microvolt-<name>" property at OPP node according to the actual conditions. These configurations are generally in the "DTSI " file. Take RK3328 as an example:
cpu0_opp_table: cpu0-opp-table {
	compatible = "operating-points-v2";
	opp-shared;

	/*
	 * Get CPU leakage from eFuse or OTP
	 */
	nvmem-cells = <&cpu_leakage>;
	nvmem-cell-names = "cpu_leakage";

	/*
	 * If leakage is between 1mA and 10mA, OPP will use the voltage specified by
	 * opp-microvolt-L0.
	 * If leakage is between 11mA and 254mA, OPP will use the voltage specified by
	 * opp-microvolt-L1
	 *
	 * If delete "rockchip,leakage-voltage-sel" or leakage exceed the range, OPP will
	 * use the voltage specified by "opp-microvolt".
	 */
	rockchip,leakage-voltage-sel = <
		1   10    0
		11  254   1
	>;

	opp-408000000 {
		opp-hz = /bits/ 64 <408000000>;
		opp-microvolt = <950000 950000 1350000>;
		opp-microvolt-L0 = <950000 950000 1350000>;
		opp-microvolt-L1 = <950000 950000 1350000>;
		clock-latency-ns = <40000>;
		opp-suspend;
	};
	...
    opp-1296000000 {
		opp-hz = /bits/ 64 <1296000000>;
		opp-microvolt = <1350000 1350000 1350000>;
		opp-microvolt-L0 = <1350000 1350000 1350000>;
		opp-microvolt-L1 = <1300000 1300000 1350000>;
		clock-latency-ns = <40000>;
	};
};
To turn off this feature, you can delete property "rockchip, leak-voltage-sel" , then OPP will use the voltage specified by "opp-microvolt".
Modify OPP Table According to PVTM
CPU PVTM (Process-Voltage-Temperature Monitor) is a module located near CPU, which can reflect the difference in performance between chips. It is affected by process, voltage and temperature.
Modify Voltage According to PVTM
Background: we find that the Vmin of small PVTM chips is larger than big PVTM chips from test, so we can reduce the voltage for big PVTM chips to reduce power consumption and improve performance.
Function description: get the PVTM value at the specified voltage and frequency and convert it to the PVTM value at the reference temperature, and get the voltage selector corresponding to the PVTM from a particular table, then we can find a property "opp-microvolt-<selector>" in each OPP, it is the target voltage for the OPP.
Configure method: Firstly, add the related code for PVTM. For code details, please refer to the related documents of PVTM. Then add properties "rockchip, pvtm-voltage-sel", "rockchip, thermal-zone" and "rockchip, pvtm-<name>" to the OPP Table node, in the case of various processes, add property "nvmem-cells" and "nvmem-cell-names", and add property "opp-microvolt-<name>" to OPP node according to the actual conditions. These configurations are generally in the DTSI file. Take RK3288 as an example:
cpu0_opp_table: opp_table0 {
	compatible = "operating-points-v2";
	opp-shared;

	...
	/*
	 * Get CPU process infomation from eFuese or OTP
	 * If only contains one process, you should do nothing with process_version.
	 * If contains more than one's, need to adding below
	 */
	nvmem-cells = <&process_version>;
	nvmem-cell-names = "process";

	/*
	 * IF only one process,please add property "rockchip,pvtm-voltage-sel" to OPP Table
	 * node, and add "opp-microvolt-L0","opp-microvolt-L1" to OPP node for distinguish
	 * voltage.
	 * If more than one process: for example process0 and process1, if this 2 process
	 * configuration different with each other, please add "rockchip,p0-pvtm-voltage-
	 * sel","rockchip,p1-pvtm-voltage-sel" to OPP Table and add "opp-microvolt-P0-L0",
	 * "opp-microvolt-P1-L0" to OPP node for distinguish voltage
	 * If this 2 process are the same process configuration, adding "rockchip,pvtm-
	 * voltage-sel" is eghough.
	 *
	 * If PVTM value is between 0 and 14300, OPP will use the voltage specified by "opp-
	 * microvolt-L0"
	 * If PVTM value is between 14301 and 15000, OPP will use the voltage specified by
	 * "opp-microvolt-L1"
	 * If PVTM value is between 15001 and 16000, OPP will use the voltage specified by
	 * "opp-microvolt-L2"
	 * If PVTM value is between 15001 and 16000, OPP will use the voltage specified by
	 * "opp-microvolt-L3"
	 *
	 * If deleted "rockchip,pvtm-voltage-sel" or PVTM value exceeds the range of the
	 * table, OPP will use the voltage specified by "opp-microvolt".
	 */
	rockchip,pvtm-voltage-sel = <
		0        14300   0
		14301    15000   1
		15001    16000   2
		16001    99999   3
	>;
	/* Before get PVTM value, chang CPU frequency to 408000Khz */
	rockchip,pvtm-freq = <408000>;
	/* Before get PVTM value, change CPU voltage to 1000000uV */
	rockchip,pvtm-volt = <1000000>;
	/* PVTM channel, format <channel sel> */
	rockchip,pvtm-ch = <0 0>;
	rockchip,pvtm-sample-time = <1000>;     /* PVTM sampling time, unit is us */
	rockchip,pvtm-number = <10>;            /* PVTM sampling number */
	rockchip,pvtm-error = <1000>;       /* error can be afford between sampling data */
	rockchip,pvtm-ref-temp = <35>;          /* refrence temperature */
	/*
	 * Proportional coefficient of temperature, when below reference temperature use the
	 * first coefficient, when higher use the second one
	 */
	rockchip,pvtm-temp-prop = <(-18) (-18)>;
	rockchip,thermal-zone = "soc-thermal";  /* get temperature from soc-thermal */

	opp-126000000 {
		opp-hz = /bits/ 64 <126000000>;
		opp-microvolt = <950000 950000 1350000>;
		opp-microvolt-L0 = <950000 950000 1350000>;
		opp-microvolt-L1 = <950000 950000 1350000>;
		opp-microvolt-L2 = <950000 950000 1350000>;
		opp-microvolt-L3 = <950000 950000 1350000>;
		clock-latency-ns = <40000>;
	};
	...
	opp-1608000000 {
		opp-hz = /bits/ 64 <1608000000>;
		opp-microvolt = <1350000 1350000 1350000>;
		opp-microvolt-L0 = <1350000 1350000 1350000>;
		opp-microvolt-L1 = <1350000 1350000 1350000>;
		opp-microvolt-L2 = <1300000 1300000 1350000>;
		opp-microvolt-L3 = <1250000 1250000 1350000>;
		clock-latency-ns = <40000>;
	};
};
To turn off this feature, you can delete the property "rockchip, pvtm-voltage-sel" , OPP will use the voltage specified by "opp-microvolt".
Modify OPP Table According to IR-Drop
IR-Drop is a phenomenon that a voltage drop or rise in power and ground networks in integrated circuits. Here we consider it as the ripple voltage case by power ripple and board layout.
Background: It has been found that some customer's solution have poor ripple voltage. If use the same OPP Table as EVB, the voltage of some frequency will be low, which affects system stability. In this case, the OPP Table needs to be adjusted according to IR-Drop.
Function description: The difference between the ripple of the EVB and he ripple of prototype board at each frequency is the volage that needs to add for this frequency.
Configuration method: Add properies "rockchip, max-volt", "rockchip, evb-irdrop" and "rockchip, board-irdrop" to the OPP Table node , "rockchip, board-irdrop" is generally configured in the board-level DTS file, others are configured in the DTSI file.
Take RK3326 as an example, the DTSI is configured as follows:
cpu0_opp_table: cpu0-opp-table {
	compatible = "operating-points-v2";
	opp-shared;

	rockchip,max-volt = <1350000>; /* the highest voltage, unit is uV */
	rockchip,evb-irdrop = <25000>; /* ripple voltage of EVB or SDK */
}
The board-level DTS is configured as follows:
&cpu0_opp_table {
	/*
	 * max IR-drop values on different freq condition for this board!
	 */
	/*
	 * ripple voltage at diffrent frequencies
	 * If frequency is between 0MHz-815MHz, ripple voltage is 37500uV, the target
	 * voltage will add 12500uV(37500-25000(EVB ripple voltage))
	 * If frequency is between 816Mhz-1119MHz, ripple voltage is 50000uV, the target
	 * voltage will add 25000uV(50000-25000(EVB ripple voltage))
	 * If frequency is between 816Mhz-1119MHz, ripple voltage is 50000uV, the target
	 * voltage will add 50000uV(75000-25000(EVB ripple voltage))
	 */
	rockchip,board-irdrop = <
	/*MHz	MHz		uV */
		0		815		37500
		816		1119	50000
		1200	1512	75000
	>;
};
To turn off this feature, delete property “rockchip,board-irdrop”.
Wide Temperature Configuration
Wide temperature usually means ambient temperature is from − 40℃ to + 85℃.
Background: It has been found that some platforms are unstable in low temperature environment and can run stably after raised voltage at some frequency. In this case, the voltage needs to be adjust according to the temperature. It is also found that the life of the chip will be shortened under high temperature and high voltage, so it is also necessary to limit the frequency and voltage according to the temperature.
Function description: When the system detects that the temperature is lower than a specific value, it will raises the voltage of each frequency. If the voltage of some frequency exceeds the maximum voltage ristricted by system, these frequency will be prohibited, that is, working without these frequencies. When the temperature returns to normal temperature, the voltage returns to the default state. When the system detects that the temperature is higher than a certain value, the frequency at which the voltage exceeds a certain value will be limited. The temperature returns normal, the frequency limit release.
Configuration method: To support low temperature, add properties "rockchip, temp-hysteresis", "rockchip, low-temp", "rockchip, low-temp-min-volt", "rockchip, low-temp-adjust-volt", "rockchip, max-volt" to the OPP Table node. To support high temperature, add properties "rockchip, temp-hysteresis", "rockchip, high-temp" and "rockchip, high-temp-max-volt" to the OPP Table node. These configurations are generally in the DTSI file.
cpu0_opp_table: opp_table0 {
	compatible = "operating-points-v2";
	opp-shared;

	/*
	 * Hysteresis parameter, unit is millicelusius, prevent from entry into low
	 * temperatures or high temperatures frequently
	 * For example, when temperature less than 0 Celsius degrees, work on the low
	 * temperature state, higher than 5 Celsius degrees, return to normal state.
	 * Temperature is higher than 85 Celsius degrees work on the high temperature state,
	 * less than 80 Celsius degrees to return to normal state.
	 */
	rockchip,temp-hysteresis = <5000>;
	rockchip,low-temp = <0>;     /* Threshold for low temperature, millicelsius*/
	rockchip,low-temp-min-volt = <900000>;  /* Minimum voltage at low temperature, uV */
	 /* In lower temperature state, add 25mV to frequency at 0-1800MHz */
	rockchip,low-temp-adjust-volt = <
		/* MHz    MHz    uV */
		   0      1800   25000
	>;
	/* highest voltage, unit is uV */
	rockchip,max-volt = <1250000>;

	rockchip,high-temp = <85000>;    /* Threshold for high temperature, millicelsius */
	/*
	 * the highest voltage at high temperature state, if value exceeds which, the
	 * frequency will be ristricted
	 */
	rockchip,high-temp-max-volt = <1200000>;
	...
}
User Interface Introduction
Non-big.Little platforms, such as RK3288, RK3326, RK3328, all cores share one clock and have the same user interface "/sys/devices/system/cpu/cpufreq/policy0/ ".
Big.Little platforms, such as RK3368, RK3399, contains two clusters, each one have its own independent clock and user interface. For example, cluster0 is little cores, and the interface is in directory "/sys/devices/system/cpu/cpufreq/ In the policy0/", cluster1 is big cores, and the interface is in the directory" /sys/devices/system/cpu/cpufreq/policy4/ ".
Through the user interface, you can change the governor, check current frequency and chang frequency, etc.as follows:
related_cpus                  /* All CPUs at the same cluster*/
affected_cpus                 /* All online CPUs at the same cluster */
cpuinfo_transition_latency    /* the transition time of two frequencies, unit is ns */
cpuinfo_max_freq              /* the maximun operated frequency */
cpuinfo_min_freq              /* the minimun operated frequency */
cpuinfo_cur_freq              /* current frequency get from hardware */
scaling_available_frequencies /* available frequencies */
scaling_available_governors   /* available cpufreq governors */
scaling_governor              /* current cpufreq governor */
scaling_cur_freq              /* the last frequency set by software*/
scaling_max_freq              /* the maximum frequency restricted on software*/
scaling_min_freq              /* the minimum frequency restricted on software*/
scaling_setspeed              /* used to change frequency when governor is userspace */
stats/time_in_state           /* record work time at each frequency, unit is 10ms */
stats/total_trans             /* record frequency scaling times */
stats/trans_table             /* record frequency scaling times of each frequency */
FAQ
Maximum Frequency of Different Platforms
| Chipset | ARM Core | the Maximum Frequency |
|---|---|---|
| RK312x | 4 * A7 | 1200MHz |
| RK322x | 4 * A7 | 1464MHz |
| RK3288 | 4 * A17 | 1608MHz |
| RK3328 | 4 * A53 | 1296MHz |
| RK3368 | 4 * A53 + 4 * A53 | 1512MHz(big) + 1200MHz(little) |
| RK3399 | 2 * A72 + 4 * A53 | 1800MHz(big) + 1416MHz(little) |
How to Check OPP Table
Input command below:
cat /sys/kernel/debug/opp/opp_summary
Take PX30 as an example
 device                rate(Hz)    target(uV)    min(uV)    max(uV)
-------------------------------------------------------------------
 cpu0
                      408000000       950000      950000     1350000
                      600000000       950000      950000     1350000
                      816000000      1000000     1000000     1350000
                     1008000000      1125000     1125000     1350000
                     1200000000      1275000     1275000     1350000
                     1248000000      1300000     1300000     1350000
                     1296000000      1350000     1350000     1350000
                     1416000000      1350000     1350000     1350000
                     1512000000      1350000     1350000     1350000
How to Change Voltage of OPP
Method 1: modify each voltage of OPP directly.
For example, add 25000uV for 816MHz. Default as below for example:
opp-816000000 {
	opp-hz = /bits/ 64 <816000000>;
	opp-microvolt = <1075000 1075000 1350000>;
	opp-microvolt-L0 = <1075000 1075000 1350000>;
	opp-microvolt-L1 = <1050000 1050000 1350000>;
	opp-microvolt-L2 = <1000000 1000000 1350000>;
	opp-microvolt-L3 = <950000 950000 1350000>;
	clock-latency-ns = <40000>;
	opp-suspend;
};
After change as below:
opp-816000000 {
	opp-hz = /bits/ 64 <816000000>;
    /* Unit is uV, format <target min max>, add 25000000 to target and min,
     * max is the highest voltage, don't change it.
     */
	opp-microvolt = <1100000 1100000 1350000>;
	opp-microvolt-L0 = <1100000 1100000 1350000>;
	opp-microvolt-L1 = <107500 1075000 1350000>;
	opp-microvolt-L2 = <1025000 1025000 1350000>;
	opp-microvolt-L3 = <975000 975000 1350000>;
	clock-latency-ns = <40000>;
	opp-suspend;
};
Method 2: Modify IR-Drop configuration to change voltage, refer to document here chapter3.7.
For example, increase 25000uV at CPU frequency below 408MHz. IR-Drop default as below for example:
&cpu0_opp_table {
	/*
	 * max IR-drop values on different freq condition for this board!
	 */
	/*
	 * ripple voltage at diffrent frequencies
	 * 0Mhz-815MHz,ripple voltage is 37500uV,the target voltage will increase by
	 * 12500uV(37500-25000(EVB ripple voltage))
	 * 816Mhz-1119MHz,ripple voltage is 50000uV,the target voltage will increase by
	 * 12500uV(50000-25000(EVB ripple voltage))
	 * 1200Mhz-1512MHz,ripple voltage is 75000uV,the target voltage will increase by
	 * 50000uV (75000-25000(EVB ripple voltage))
	 */
	rockchip,board-irdrop = <
	/*MHz	MHz		uV */
		0		815		37500
		816		1119	50000
		1200	1512	75000
	>;
};
After change:
&cpu0_opp_table {
	/*
	 * max IR-drop values on different freq condition for this board!
	 */
	/*
	 * ripple voltage at diffrent frequencies
	 * 0Mhz-408Mhz,ripple voltage is 62500uV, the target voltage will increase by
	 * 37500uV(62500-25000(EVB ripple voltage)
	 * 409Mhz-815MHz,ripple voltage is 37500uV,the target voltage will increase by
	 * 12500uV(37500-25000(EVB ripple voltage))
	 * 816Mhz-1119MHz,ripple voltage is 50000uV,the target voltage will increase by
	 * 12500uV(50000-25000(EVB ripple voltage))
	 * 1200Mhz-1512MHz,ripple voltage is 75000uV,the target voltage will increase by
	 * 50000uV((75000-25000(EVB ripple voltage))
	 */
	rockchip,board-irdrop = <
	/*MHz	MHz		uV */
		0		408		62500 /* from 37500 to 62500 */
		409		815		37500
		816		1119	50000
		1200	1512	75000
	>;
};
How to Fix Frequency
Method 1: Set governor to userspace in menuconfig and set CPU frequency in cru devicetree node.
Method 2: Disable OPPs you don't need at OPP table, leave what you need alone. Take RK3308 as an example, fix CPU frequency to1008Mhz, code as below:
cpu0_opp_table: cpu0-opp-table {
		compatible = "operating-points-v2";
		opp-shared;

		opp-408000000 {
			opp-hz = /bits/ 64 <408000000>;
			opp-microvolt = <950000 950000 1340000>;
			clock-latency-ns = <40000>;
			opp-suspend;
			status = "disabled";
		};
		opp-600000000 {
			opp-hz = /bits/ 64 <600000000>;
			opp-microvolt = <950000 950000 1340000>;
			clock-latency-ns = <40000>;
			status = "disabled";
		};
		opp-816000000 {
			opp-hz = /bits/ 64 <816000000>;
			opp-microvolt = <1025000 1025000 1340000>;
			clock-latency-ns = <40000>;
			status = "disabled";
		};
		opp-1008000000 {
			opp-hz = /bits/ 64 <1008000000>;
			opp-microvolt = <1125000 1125000 1340000>;
			clock-latency-ns = <40000>;
		};
		opp-1200000000 {
			opp-hz = /bits/ 64 <1200000000>;
			opp-microvolt = <1250000 1250000 1340000>;
			clock-latency-ns = <40000>;
			status = "disabled";
		};
		opp-1296000000 {
			opp-hz = /bits/ 64 <1296000000>;
			opp-microvolt = <1300000 1300000 1340000>;
			clock-latency-ns = <40000>;
			status = "disabled";
		};
	};
Method 3: Through command at device running time:
Non -big.LITTLE core chipset, like RK3288, command as below:
/* set governor to userspace */
echo userspace > /sys/devices/system/cpu/cpufreq/policy0/scaling_governor
/* set frequency to 216MHz */
echo 216000 > /sys/devices/system/cpu/cpufreq/policy0/scaling_setspeed
For big.LITTLE core chipset , like RK3399, command as below:
/* set LITTLE core governor to userspace */
echo userspace > /sys/devices/system/cpu/cpufreq/policy0/scaling_governor
/* set LITTLE core frequency to 216Mhz */
echo 216000 > /sys/devices/system/cpu/cpufreq/policy0/scaling_setspeed

/* set big core governor to userspace */
echo userspace > /sys/devices/system/cpu/cpufreq/policy4/scaling_governor
/* set big core frequceny to 408Mhz */
echo 408000 > /sys/devices/system/cpu/cpufreq/policy4/scaling_setspeed
Notice: Setting CPU frequency through cpufreq node usually change voltage at the same time, except two frequencies hold the same voltage.
How to Check Current Frequency
The user interface of cpufreq and debugfs interface of clock allow to check frequency.
For non big.LITTLE core chipset, command ad below
/* Method 1: cpufreq userspace interface */
cat /sys/devices/system/cpu/cpufreq/policy0/scaling_cur_freq

/* Method 2: clock debug interface */
cat /sys/kernel/debug/clk/armclk/clk_rate
For big.LITTLE core chipset, command ad below
/* Method 1: cpufreq userspace interface */
cat /sys/devices/system/cpu/cpufreq/policy0/scaling_cur_freq /* LITTLE core frequency */
cat /sys/devices/system/cpu/cpufreq/policy4/scaling_cur_freq /* big core frequency */

/* Method 2: clock debug interface*/
cat /sys/kernel/debug/clk/armclkl/clk_rate /* LITTLE core frequency*/
cat /sys/kernel/debug/clk/armclkb/clk_rate /* big core frequency */
How to Check Current Voltage
For non big.LITTLE core chipset, command ad below
/* here vdd_core is not the fixing name, please modify */
cat /sys/kernel/debug/regulator/vdd_core/voltage
For big.LITTLE core chipset, command ad below
/* here vdd_core_l and vdd_core_b are not the fixing name, please modify */
cat /sys/kernel/debug/regulator/vdd_core_l/voltage /* LITTLE core voltage*/
cat /sys/kernel/debug/regulator/vdd_core_b/voltage /* big core voltage*/
How to Set Voltage and Frequency Separately
Set cpufreq governor to userspace, refer to chapter 5.4 method 3.
Set frequency, use clock debugfs interface as below:
/* For non big.LITTLE core chipset,like RK3288, set frequency to 216MHz */
echo 216000000 > /sys/kernel/debug/clk/armclk/clk_rate  /* set frequency */
cat /sys/kernel/debug/clk/armclkl/clk_rate              /* get frequency */

/*
 * For big.LITTLE core chipset, such as RK3399, set LITTLE core frequncy to 216MHz, set
 * big core frequency to 408MHz
 */
echo 216000000 > /sys/kernel/debug/clk/armclkl/clk_rate /* set LITTLE core frequency */
cat /sys/kernel/debug/clk/armclkl/clk_rate              /* get LITTLE core frequency*/
echo 408000000 > /sys/kernel/debug/clk/armclkb/clk_rate /* set big core frequency */
cat /sys/kernel/debug/clk/armclkb/clk_rate              /* get big core frequency*/
Set voltage, use regulater debugfs interface as below:
/*
 * For non big.LITTLE core chipset,like RK3288, set voltage to 950mV
 * vdd_core is not the fixed name, please modify according to the actual regulator
 * configuration
 */
echo 950000 > /sys/kernel/debug/regulator/vdd_core/voltage  /* set voltage */
cat /sys/kernel/debug/regulator/vdd_core/voltage            /* get voltage */

/*
 * For big.LITTLE core chipset, such as RK3399, LITTLE core set to 950mV, big core set
 * to 1000mV
 * vdd_core_l and vdd_core_b are not the fixed name, please modify according to the
 * actual regulator configuration
 */
/* set LITTLE core voltage */
echo 950000 > /sys/kernel/debug/regulator/vdd_core_l/voltage
/* get LITTLE core voltage */
cat /sys/kernel/debug/regulator/vdd_core_l/voltage
echo 950000 > /sys/kernel/debug/regulator/vdd_core_b/voltage  /* set big core voltage */
cat /sys/kernel/debug/regulator/vdd_core_b/voltage            /* get big core voltage */
Notice: Before raise frequency, increasing voltage first. Before reduce frequency, decrease frequency and then decrease voltage.
How to Check the Voltage of the OPP
If support modifying voltage according to PVTM, input command below:
dmesg | grep pvtm
Take RK3399 as example, it will prints as below:
[    0.669456] cpu cpu0: temp=22222, pvtm=138792 (140977 + -2185)
/* pvtm-volt-sel=0, opp-microvolt-L0 property will be used in little cpu OPP table */
[    0.670601] cpu cpu0: pvtm-volt-sel=0
[    0.683008] cpu cpu4: temp=22222, pvtm=148761 (150110 + -1349)
/* pvtm-volt-sel=1, opp-microvolt-L1 property will be used in big cpu OPP table */
[    0.683109] cpu cpu4: pvtm-volt-sel=1
[    1.495247] rockchip-dmc dmc: Failed to get pvtm
[    3.366028] mali ff9a0000.gpu: temp=22777, pvtm=120824 (121698 + -874)
[    3.366915] mali ff9a0000.gpu: pvtm-volt-sel=0
Similarly, if support modifying voltage according to leakage, input the following command and there will have similar print output.
dmesg | grep leakage
How to Check Current Leakage
Input command below
dmesg | grep leakage
Take RK3399 CPU as example, it will print as below:
[    0.656175] cpu cpu0: leakage=10 /* leakage=10,little cpu leakage is 10mA */
[    0.671092] cpu cpu4: leakage=20 /* leakage=20,big cpu leakage is 20mA */
[    1.492769] rockchip-dmc dmc: Failed to get leakage
[    3.341084] mali ff9a0000.gpu: leakage=15